 |
![]()
Lesson
Four: Locating Pluto
by John Barra
 |
 |
![]()
![]()
![]()
The most difficult
part of locating Pluto is not getting Pluto within your eyepiece; it is
being able to determine that you in fact have the planet in your eyepiece.
Stated differently, it is being able to pick out Pluto among the many
nearby dim stars.
We will explain the preparation and process necessary for the advanced amateur to locate Pluto. We will then document how we used these techniques last year to locate the planet. Finally, we will explain how you can accomplish this feat this summer or any summer.
Preparation
The first step is to get the exact coordinates of Pluto for the time and date of your attempt to locate the planet. You can obtain this information from any good planetarium software program. There are also various sites on the Internet; for example,
http://www.fourmilab.to/yoursky/catalogues/planets.html .
The most important step is obtaining accurate star charts. You will need at least three different charts. The first is a chart with a wide field of view. Any star chart with coordinates will do. Simply plot Pluto on this chart from the coordinates obtained. Even an astronomy magazine chart with tick marks for Pluto during the year will suffice. The purpose of this chart is to show the general field. It can also be used as the first step in starhopping if you use that technique. Locate the closest naked eye star.
The next chart should cover a field of three or four degrees. A good star chart made by any decent star chart software with star magnitudes up to 10th magnitude is necessary. If you are starhopping, you will use this chart to locate a series of stars that will lead to the small field containing Pluto. If you have a computerized telescope, this chart will help you confirm that you have correctly narrowed the field.
Finally, the last chart must be very accurate. Since Pluto averages magnitude 13.7, this chart should contain stars to magnitude 15. It is necessary to have stars that are faint enough on it in order to have fainter objects to compare Pluto to. This chart should cover a field of no greater than 20 arcminutes.
The last preparation is to modify the charts to the type of telescopic view that will be seen during the observations. If your telescope has a reverse view, such as a Schmidt-Cassegrain with a star diagonal, make sure that your final two charts are reversed. Some computer programs will make the charts reversed.
If not, turn your chart upside down on a light and mark the objects on the reverse side. It is also necessary that the final chart differentiate the stars by magnitude. It helps to write in the magnitude of each star near Pluto if you can obtain that information.
In the Field
As mentioned earlier, to locate Pluto it is necessary to have a telescope that can locate stars as dim as magnitude 15. You will need to be at a dark site with excellent seeing conditions.
Using the first chart and a very low power eyepiece, locate a nearby bright target star and starhop to the general field that contains Pluto. Then with the second chart and the same eyepiece, move to the spot where the planet should be located. Put in a medium power eyepiece and confirm that you are in the right location. Center the spot that should contain Pluto.
If you are using an electronic telescope, skip the first step. Use a low power eyepiece and plug in the correct coordinates. Allow the telescope to slew to the correct spot and compare the view with your second chart. Put in a medium power eyepiece and verify that you are in the right spot. Center the field if necessary.
The last step is to put in a high power eyepiece and compare the field with your third chart. It helps if you have a wide angle high power eyepiece. Hopefully you will see Pluto where the chart indicates. Compare its apparent brightness to the nearby stars and their indicated magnitude. If Pluto is in the exact position as shown by your chart, note it. If it is in a slightly different position, mark it on your chart. If the planet is not in your field, start over and try again.
Verification
When you get home, you can make a tentative verification by use of the Internet. Go to the Digitized Sky Survey at http://stdatu.stsci.edu/cgi-bin/dss_form. Plug in the coordinates used for Pluto and compare the downloaded photo of the field with your chart. Note that these photos will contain many dimmer stars. However, you should be able to find the pattern of stars from your chart, because they will appear brighter in the photo. There should be no object or only a much dimmer star at or near the spot corresponding to where you located Pluto.
Real verification comes the next viewing night. First, use the same chart and procedure you used the first night. If there now is no object where you marked the planet the first night, then that object moved it was indeed Pluto!
Finally, use new charts based on the new coordinates for the time and date of the second viewing session. You should be able to repeat your success.
Pluto: 1999, 2000, and Beyond
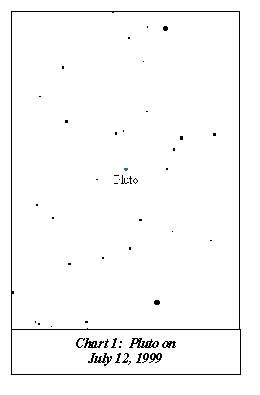
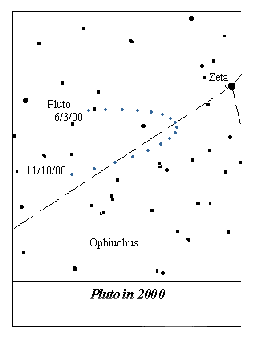
We used this procedure to locate Pluto on July 10, 1999, and again on August 3, 1999. We used the 14-inch Celestron at Jubilee, with 40 mm, 26 mm, 14 mm wide-angle, and 9 mm wide-angle eyepieces. Chart 1 shows the high power chart we used the first night to locate Pluto. Chart 2 shows the same field on the second night, with Pluto absent, verifying our finding. The chart on page one of this issue of Starlite shows a wide-field view for Pluto during the summer of 2000. The marks for Pluto are in ten-day intervals.
Since Pluto revolves around the sun every 248 years, it will remain in the same constellation for approximately 12 years. Pluto currently can be found in Ophiucus. Make the appropriate charts based on the coordinates for the dates you are going to attempt to locate Pluto and follow the suggested procedure. In future years, just obtain new charts with the appropriate coordinates.
If you follow this procedure and locate the planet, drop us a short description. We will memorialize your success in a future Starlite.
![]()
![]()
copyright © Peoria Astronomical Society 1994-2004.