 |
![]()
Lesson
Two: Star Trail Photography
by Eric Clifton
![]()
![]()
![]()
When our Observing Chairman, John Barra, asked me to write a primer on astrophotography I wondered where should I start. There are all kinds of good books on the subject, articles and equipment reviews appear almost monthly in Astronomy and Sky & Telescope, and there are some terrific web sites that are linked from our Societys home page. What could I add to that wealth of information?
I decided to focus on a form of astrophotography that is both simple and cheap...and which will give the beginning astrophotographer results that are pleasing enough that he wont get discouraged and blow off any further attempts. Im talking about Star Trail photography. Equipment demands are minimal and it doesnt require a great deal of effort or take a decade of practice to get something back from the FotoMat that youll be satisfied with.
Basic equipment for any form of astrophotography includes a camera with a shutter that you can lock open. This excludes a lot of the popular point-and-shoot cameras. An old manually operated camera is best, but newer all-electronic cameras will work just as well, just plan to use up an extra battery or two. For the kinds of pictures were talking about here star trails, primarily your regular 35 mm lenses will do just fine. Youll also need a locking cable release for your camera.
Dozens of articles have appeared on what film to use. There are different films for different jobs. Low contrast films for photos of the quarter Moon; high contrast films for full Moon shots. Films with enhanced red sensitivity for emission nebulae; hypersensitized films for long exposure photography. Complicating the issue of this vast realm of film types is a considerable variety of photo processing techniques. So, to keep it simple in the beginning, Id suggest starting with your corner drugstore or one-hour photo shop.
For the types of photos well be taking, almost any film will do. For starters, Id recommend a 200 or 400 speed film. In recent years, Ive been happy with Kodak Pro-400 but Kodak recently took it off the market. Slide or negative film isnt too important yet, either. I used to shoot on slides but now I use negative film almost exclusively. Generally, I think you get better prints from negatives but you learn more, especially early on, about proper exposure by shooting on slides. (Photo labs will try quite hard to give you a print from even a lousy negative.
Consequently, your mistakes are hidden from you. When youre still learning, it can be good to eliminate the variable of the middle-man in the print processing lab.)
Well start with Star Trail photography, probably the easiest way to take pictures of the sky. Basically, all you really need besides the camera and cable release is a reasonably solid tripod. (Some folks might argue that a hair dryer is also a necessity to eliminate the dew that will surely fall onto your camera.)
Plan to shoot with your normal 50 mm lens or use a wide angle. Forget about using a telephoto much more than about 85 mm or so. Your best results will come from the shorter lenses.
First of all...drive out into the boonies...get away from the city lights. Find a safe place to set up, attach your camera to the tripod, and point it at the sky. Stop down your cameras lens by one or two f/stops from the widest opening. (Most camera lenses are much sharper when theyre not shooting at the maximum aperture.) Take a series of eight photos, starting with 15 seconds, then a half-minute, then a minute, then two minutes, doubling each exposure until you get up to about an hour.
The next day, take your film to your favorite photo processing lab. I like to get 4 x 6 prints because they show the entire 35 mm frame. (With 3½ x 5, 5 x 7 and 8 x 10 prints, you end up having part of your negative cut off when it is printed.)
Take a look at the sequence of negatives in which you doubled exposure each time. Some negatives, the 15- and 30-second ones, probably wont have much at all on them. On the other hand, your 30- and 60-minute exposures will probably appear almost black. Most of this blackening is due to airglow, sky fog, light pollution, etc. This means that these exposures are longer than optimum. When you expose too long, the fainter stars will be obscured on your film by this background fogging.
Looking through the sequence, find the negative in which the blackening or sky fog just barely begins to appear, by comparing with the orange base of the negative. This image represents your optimum exposure time for the particular film, the particular f/stop, and for the particular conditions of the night you went out to shoot. Remember this exposure time youll want to use it in the future. My guess is that youll find your best exposure time is around the 15-30 minute mark. Also, check your prints to see what exposure gives you the best color.
One final note...When you go out to shoot star trails remember to bracket your exposures. If 15 minutes is your optimum exposure time, youll want to take an 8-minute exposure (½ as long) and a 30-minute exposure (twice as long)...just in case. Compared to the cost of your time and effort, film is cheap, so make those extra insurance shots and be sure that you come home with a decent photo.
So...now that youve learned how to take your first star trail photos, what can you do with your new knowledge? Actually there are a number of ways to make star trails a part of attractive photos.
Try a series of shots looking north, then south and later east and west. Youll wind up with an educational set of photos that show circular star trails around Polaris, straight trails rising at an angle to the eastern horizon or setting in the west, or concentric arcs centered on the south point of your local horizon.
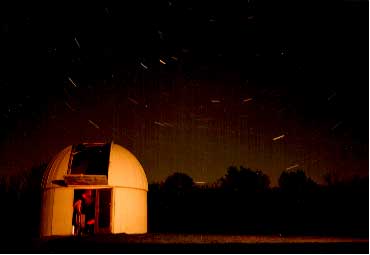
Another thing to try is to frame your shot so that a foreground object like your buddys telescope is silhouetted against the background sky. During the exposure you can even fire your automatic electronic flash to illuminate the telescope and your buddy but still capture the star trails behind him. (Youll want to check your depth-of-field before starting the photograph to make sure that both the stars in the background and your buddy in the foreground are sufficiently sharp.)
Using star trail photo techniques, you can get a great shot during a meteor shower. Intermixed with the gently curving trails of the stars will be the straight trails of the falling meteors. If youre lucky, you might catch one or two point meteors meteors that are traveling directly at you and your camera. Meteor photography, in general, is a matter of luck...you aim the camera and then really, really hope that a meteor passes by within the field of view. The best thing to do is simply take a lot of relatively short 15- to 20-minute exposures to avoid building up excessive skyfog. Many people recommend that if you see that a bright meteor has been recorded by the camera, end that exposure immediately and go on to the next one.
Many very nice photos were taken of Comet Hale-Bopp using star trail photography. Cometary photography is a good example of why you do not want to use a telephoto lens for star trails. The object of the comet photo is to make the comet look as real as possible. Using short, 2- to 4-minute exposures, you can almost freeze the moving heavens to capture what the comet looks like visually. When you attempt to use a telephoto lens, you have two things working against you. First, your normal 50 mm lens is probably f/1.4 or f/2, which means you can record the comet using a fairly short exposure. A telephoto lens, working at f/4.5 or f/5.6, will require a much longer exposure. During this longer exposure, the Earth turns farther, thus causing a considerable amount of smearing of the comets image. Secondly, the longer focal length of, for example, a 200 mm telephoto means that the comets smear will be four times longer on the film than it was when you used the same exposure time with the normal 50 mm lens. So stick with the short lenses for tripod photos of comets.
Youll see other interesting features in your star trail photos. A satellite will cause a straight streak across the image...maybe at constant brightness, maybe not, depending on whether or not the spacecraft is tumbling or passing into the Earths shadow. The passages of aircraft are marked by (generally) straight lines across the image, punctuated by the bright flashes of the planes anti-collision strobe light. With a little bit of pre-planning before you leave home, you might even capture the 8 magnitude flare of sunlight off of an Iridium communications satellite.
Give star trails a try...dont be afraid to experiment and dont forget to take notes of your exposure times, type of film, etc., etc. These notes will prove to be invaluable time and again in the future.
![]()
NEXT ISSUE: PRIMER FOR THE ADVANCED: LESSON THREE: NAVIGATING THE VIRGO CLUSTER
![]()
copyright © Peoria Astronomical Society 1994-2004.